Saturday, 31 May 2014

Wait line clear

If you've ever seen an STN, CTN or whatever ARTC is using these days to advise of alterations to train pathing, a common abbreviation following a destination arrival time is wlc, (e.g. Kelso 1915, Tarana 1940 wlc, Rydal 2006). Roughly extrapolated this is Wait Line Clear, meaning the train must wait at the location until the line is clear of other traffic before proceeding. It is generally used on trains with a lower priority than others, such as the Robel rail set.

Wait line clear is good way to describe progress on the layout at the moment.

I've decided I wasn't happy with the painted background as I had compromised smoothness for malleability. The grooves in the timber are just too obvious. If the viewer was going to be a meter away, I'd settle for it. Instead, I've written to a company in the US who does custom, self-adhesive backdrops to produce an all-sky backdrop which I can splice the trees and mountains over from the current 'Barinore' backdrops I have. The bloke at the other end produced two samples for me overnight (!):


I prefer the first personally. Mixed with some trees, terrain at the far right, and the cement depot, it should all blend. Here's the new one and Barinore on top of each other for comparison:


Expensive perhaps, but I'm planning on keeping this layout for a while and adding to it as I get more space. For now though, Backdrop, wlc.

Keen to press on with something else while I wait for that, I've been starting to form the scenery at the right where the track exits the module under a bridge. This would allow me to then measure up the fascia, cut it, fit it, and paint it. In making some initial attempts at forming the scenery, I've found that until the Trackrite and track is down I'm going to be guesstimating where the loading bank for the cattle siding will be, as well as an appropriate height for the bridge. I prefer to get the tools out and do it once, so, Fascia, wlc.


My LED lightstrips arrived from China a few weeks ago. I've figured out how to wire them and this weekend I had planned to install them as per this post on the Stonequarry Creek blog by routing a groove in some timber and sliding them in. If I only had the right router bit. You guessed it, special order required. Lighting, wlc.

On the upside, I've had some fantastic coffee while standing in the garage staring at the modules and figuring out what to do next. You just can't beat an espresso machine for smooth - sorry. Back to model railways. Putting the train controller hat on for a moment, if you were to look at these jobs converging on one of the old paper train control graphs, the router bit is probably going to arrive before the sky backdrop, but I want to tackle the latter before anything else.

Current plan: backdrop, lighting, Trackrite, track, landform, fascia, wiring.

Looking forward to the Epping Model Railway Club's exhibition at Thornleigh next weekend too.

Plenty to do. Now to wlc.

Cheers,
Ben

Sunday, 27 April 2014

Backdrop progress

I made use of the long weekend by undercoating the backdrop in the modules with an all-in-one sealer, primer and undercoat. I painted this to the extremities of the backdrop to provide a level of protection in the longer term.


I gave it a day and a bit to dry. Today I painted the first coat of the sky blue that will sit behind the photo backdrop.


I'm definitely going to add another coat to get a better all-over consistency, but I'm undecided yet on a third. It will depend on the next part.

I had been doing some research over the internet about how to apply a 'graded' blue sky look on a backdrop. A number of the examples mentioned painting a darker shade of blue at the top, a white layer at the bottom, and blending the two together. I'm not feeling confident on my ability to gently blend the two layers, so I kept looking and came across this website from the US.

The forum post showing the results I was trying to achieve is this one:


I have two pieces of MDF I sprayed blue for backdrops to my old layout before I moved. I dragged one out and had a bit of a practice. 

The original board:


After about ten sprays back and forth of a flat white it looked like this:


Not too bad, but at normal viewing distance, it looks like this:


I'm not happy with how the specs turned out on the test piece and I think it would detract from the photo backdrop when overlaid on top. 

This needs more thinking over. I'm going to do a little more research this week as well as add the next coat to the modules' backdrop.

I was getting the itch to run trains and tempted this week to pull out the 47, convert it to DCC and set up a test track, but I'm convinced that needs to wait until the construction part is done. It's such an easy hobby to get distracted by! That said, seeing the blue on the backdrop is a visible and pleasing sign of progress. 

That's all for now.

Cheers,
Ben


Monday, 21 April 2014

Baseboard finished and another method of connecting modules

As the title suggests, this weekend I finished doing all the little nips and tucks required to fit the baseboard to the risers. I found it necessary to do this now as opposed to after undercoating and painting the backboard, so that I have a fixed element to start measuring the remaining components of the loops still to be built. Relying on measurements from parts that were 'floating' wasn't going to provide much accuracy.


Above shows the main (foreground) and cement siding baseboard. The baseboard timber had started to warp slightly at the extremities so I fixed it to 19mm x 30mm lengths for strength, then screwed that to the risers. I liquid nailed the parts sitting above the backscene and outer frame today and have weighted them, letting it set until tomorrow night. I pessimistically went over the whole thing with the spirit level just now, and was relieved to find the layout is level! I had to check a few times, but the effort in attention to detail thus has appeared to have paid off. As someone who usually rushes things and needs to do a hack job to get it to fit, this is quite rewarding.

As I've said before, I want to paint the modules before they move to their home in the train room. Despite the good weather and I didn't particularly feel like painting today after finishing the baseboards, so I sat down and sketched an idea for attaching the return loops to the modules. Because of limited space between where the backscene and end wall are in this area of the modules, I can't get a bolt in to secure and align the pieces. I had thought of pattern maker's dowels for alignment, but I'm more looking for an all-in-one secure and align solution.


The big, not-so-square rectangular thing is the end of the left-hand module. Underneath the protruding baseboard from the module, and also under the return loop baseboard would be two blocks of timber. Attached to these on both the visible side and the same place on the other side, would be a loose-pin hinge, at A and B, such as this one below.
I had this idea while looking at how Chris Nevard joined his Catcott Burtle layout to the fiddle yard. In the below photo you can see a similar, albeit smaller hinge arrangement on the left of the bottom of the module.


Mine wouldn't be load-bearing, so in theory I think it would work. I don't plan on moving it very much once it is set up, so I wouldn't have to worry about wear too much (and therefore mis-alignment) from removing and reinserting the pin either. Has anyone else tried this? I'm keen to hear thoughts on this or other ideas.

Finally I wanted to show off a bit of modelling. More accurately, this piece of scenery is about to meet the garbage man (it's sitting where the new track off the left-hand return loop needs to go) and I wanted to record it for reference when come to creating the cutting on the new layout.


My old layout was a single-line branchline terminus. The track entered here from the fiddle yard through a small cutting. The scenery is Woodland Scenics' plaster sheet over styrene foam shaped into the desired contour with a knife. I lathered some sculpting plaster over the cutting after that and scraped away at it to get the effect of erosion along the cutting wall. The ground cover is a blend of Chuck's Dust sand and red dirt, to replicate the kind of soil in the Central West of NSW, finished with a blend of three different static grasses and miniNatur grass tufts. I'm happy with how it came out.

I'll detail the exact mixtures and measurements when I get up to that stage on the new layout, but otherwise, anything you see so far you want to know more about, feel free to ask.

Happy modelling!

Tuesday, 15 April 2014

The last 32 class to Newcastle

Or will it be? For years I've put off going to Steamfest (in the Newcastle/Hunter area), but with the impending truncation of the line into Newcastle I figured it was about time to stop putting it off and get up there.

I only had a limited amount of time so the main aim of the visit was to ride the heritage service into Newcastle Station proper from Maitland, and return. Above is the first trip of the Saturday shortly after arriving in Newcastle.


Interesting cantenary arrangement at the end of the line in the above shot. Never noticed it until now.

But onto the diesels:


442 idling at Newcastle


4303 returns to Maitland from a midday Branxton shuttle. Haven't thought much about getting an Auscision 43 (if the rumours come to fruition), but I enjoyed hearing it tick over between trips at Maitland. Still, there's only so much space on the layout.

I probably spent about four hours just watching trains at Maitland; with the coal roads, Pelton EL's, north Coast NR's, passenger trains and all the heritage stuff, you really are spoiled for choice up there.

So by now you can probably guess that not much has happened on the layout since the last post. My Dad had loaned me his jigsaw, but needs it back for some renovations on the upcoming long weekend. So, work is currently halted until payday.

I'll post something in a couple of weeks when there's progress to show. Should have it upstairs again by then.

Happy Modelling!


Sunday, 6 April 2014

Return loop progress

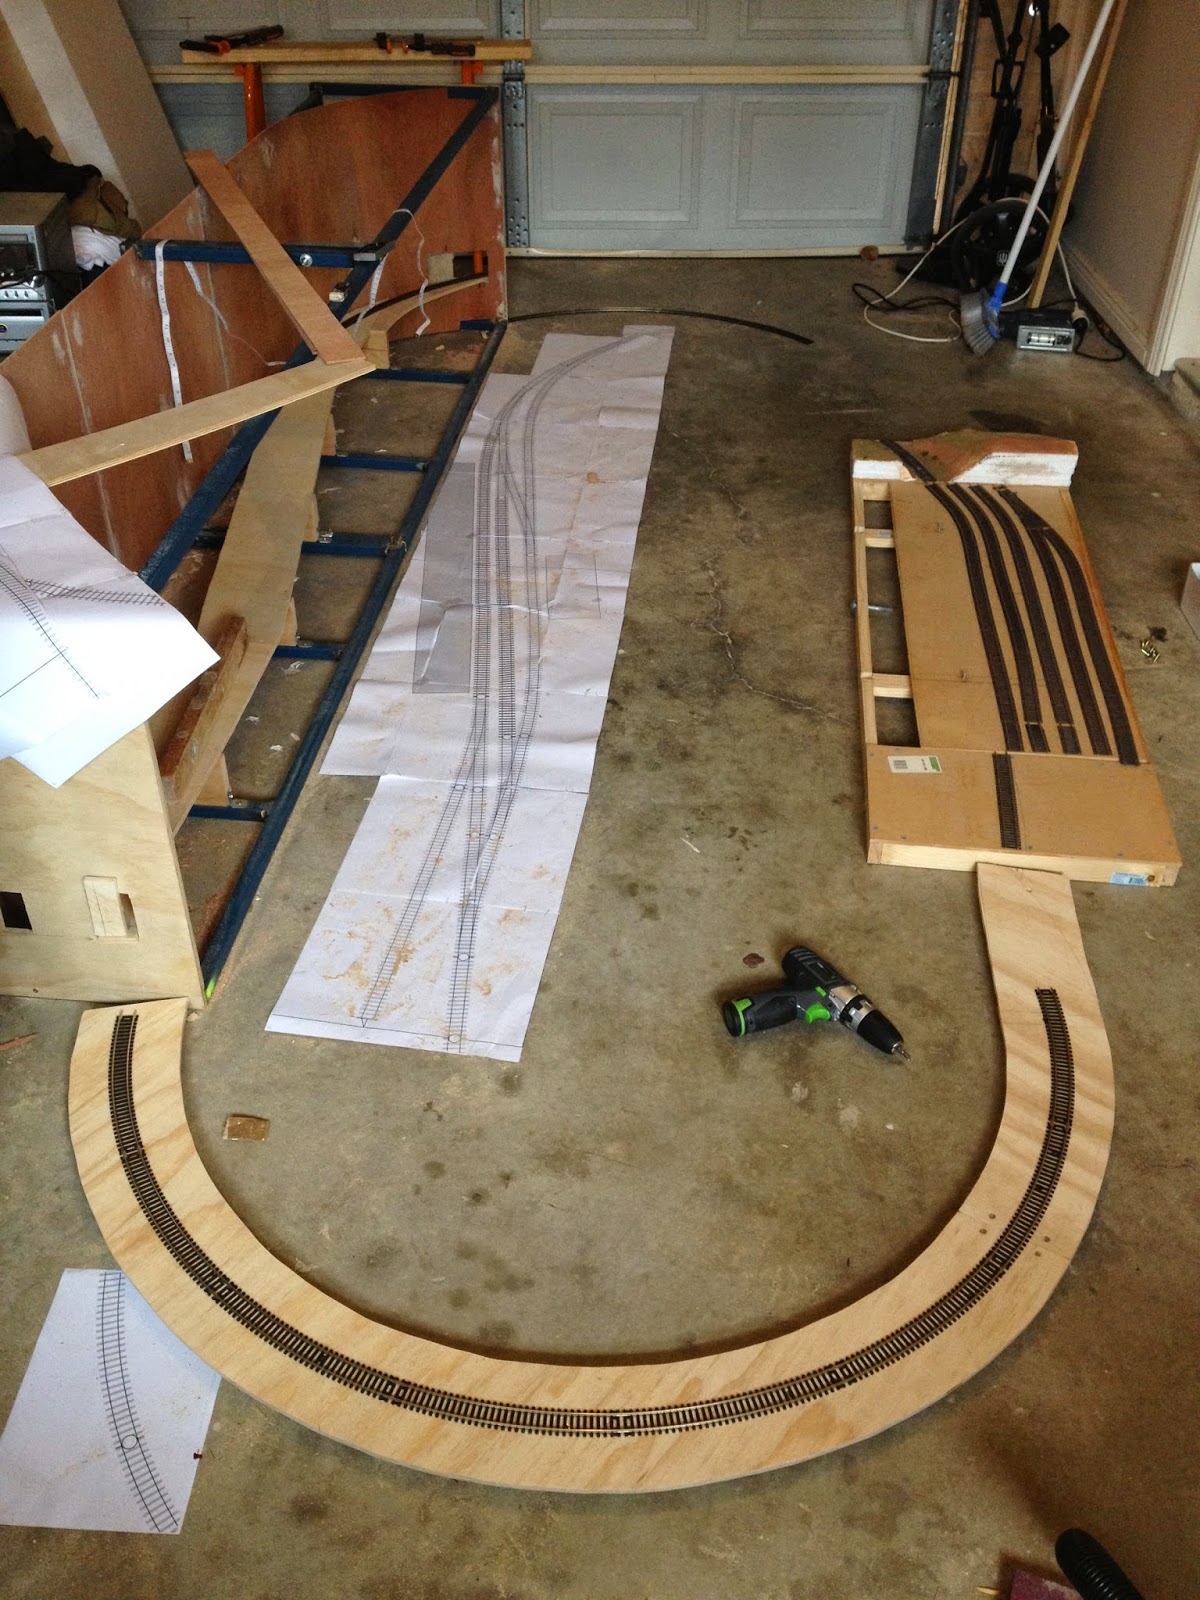
This weekend I made a start on the left-hand return loop. I picked up some additional 24" radius Atlas curved track to complete this return loop too. The advantage is less time mucking around with a track gauge and the ease of sighting the smaller and larger raidii for jig-sawing the inner and outer curves of the loop respectively. Plus, there's the added benefit of cost for the cheaper code 100 in the "off-stage" half of the layout.


I did make a small stuff-up. Above is the loop after being cut out. In the foreground I've placed a piece of 19mm x 90mm timber I used as bracing underneath to keep everything flat and join the two pieces of timber together to make up the loop. I mistakenly screwed the bracing to the top of the timber, not underneath as I should have. Luckily, this one was a case of flipping the job over and re-aligning the ends so as to mate with the module and fiddle yard. The other end will be less forgiving as the track is already on a 32" curve leaving the module before transitioning to the 24" radius return loop track and an eased curve into the fiddle yard.


Here is where I got up to today. The drill bit which fits the smaller screw size wore away this arvo (it's only cheap - another lesson learned!), and along with more screws I now also need another drill bit before I can finish this one.


Before breaking the drill bit, I lined up the fiddle yard I'm recycling from my old layout with the return loop on the garage floor. You can just make out the 90-degree 24" radius section of track laid out at the opposite end. I plan on installing a lift-up section between the end of that track and the fiddle yard. That February 2014 AMRM article is going to come in handy!

I need to scrape the old scenery and track off the fiddle yard and remove the two shelf drawer runners currently providing mobility for the traverser. That idea never really worked properly and I've since been warming to the idea of two sanded, flat pieces of timber sliding along the top of each other. Need to plan that one out a little more before committing to it though. Not quite sure what to install to prevent the two pieces from separating and unintentionally discovering which wagon in the fleet bounces the highest, but plenty of time to plan. For now I'll be working towards finishing the return loops, painting the backdrop and installing lighting before moving the layout upstairs, back to it's home.

Until next time, Happy Modelling!

Friday, 28 March 2014

Clearances

All week I have been looking forward to having the day off to work on the layout. In my mind, the end of today would have seen the first undercoat of the backboard finished and drying right now.

One day, I'll learn.

I noticed before painting that I still hadn't cut and fit the remaining holes for the baseboard to pass through at either end of the modules. You guessed it, that's where today went.

The room the layout is going to live in for the time being requires the left-hand reverse loop to run into a wardrobe and out again, before entering the fiddle yard. This wardrobe also currently prevents the cement siding from protruding out of the module for the time being. At the time of taking the photo below, I was still testing clearances for the siding off the main. Later today I cut the hole for the cement siding to continue out of the module at a later date. I figured it would be much harder to do once the track was down.


The next photo comes to the point of this post. The holes for the track and baseboard required a clearance of about 8cm x 5cm. Once I had the baseboard through the right-hand side of the backboard, I found I had forgotten to account for clearances on the vehicles traversing the section. Pictured is a silver LLV, and previously I had a KLV running through. I'm yet to get to testing my longest vehicle - a Tulloch Railcar - but I'm confident the gap is now at the right size.


The most time-consuming part was getting the holes level to accept the baseboard, and in this respect the Auscision KLV was brilliant; the wagon's free-rolling gave me a more relevant indication of progress than using the spirit level alone. Although the gap is quite long, this area will be covered by a hill and road overbridge.

Now to put down the tools and entertain for a weekend.

Cheers,
Ben

Saturday, 22 March 2014

Pole, pole...

If you're ever in East Africa, a common phrase you'll hear is "Pole, Pole" (poh-lay, poh-lay). It means "slowly, slowly," and it's used in everything from traffic signs to mountain-climbing. It also pretty adequately sums up how things are progressing on the layout at the moment.


This weekend I've finished installing all of the risers and cut out the templates for the track baseboard. I had a crack at punching through the end of the right-hand module, but I've underestimated the clearance for track, underlay and trains to get through. For now, the jigsaw gets a rest, but at least I know to be aware of it for the other end.

Reading Gary Spencer-Salt's blog about his installation of a photo-backdrop this week, I had a lightbulb moment. I had been thinking the way to reduce an impending gap between the bottom of the backdrop and the top of the scenery would have needed to be raising the risers another 20mm, however for Spicer's Creek, Gary has cut the sky from the 'Barinore' backdrop and applied it to a foamcore backing against a painted sky, and it looks quite convincing. Yoink! 

I've got some time off later this week, so I hope to be able to undercoat and paint the backboard a sky blue. I've tried to find a matt spray can of sky blue paint at Bunnings, however they're all gloss finishes. Out with the roller it is. This part of the job sucks, but at least after this I will be able to start on foam for the scenery and get the lighting installed so that the layout can vacate the garage. Then it will be onto construction of the return loops for the fiddle yard.

Still, I'm hopeful to have a train running by Anzac Day. It's frustrating close, but you can do it quickly or you can do it right.

Pole, pole.