Thursday 27 December 2018

Era interlude - RAAF Recruiting Train


A carriage set I've always been fascinated by but which has been so far out of my era that I couldn't justify a purchase was the RAAF Recruiting Train. There were two, three-car sets in total, and Set 25B ran all over the state between 1940 and 1942, pretty much doing what the advertisement suggested - "Walk in one end a farmer and out the other a signed up member of the Air Force."

I had started collecting Camco FO kits to one day build this train myself, but the part where I'd need to get custom decals had me stumped. I just didn't know who I could go to to get some made up. Fast forward a few years and SDS models have upgraded the Austrains NSW 'cowboy' cars, releasing a set in the RAAF Recruiting Train livery under their Austrains Neo brand.

I picked up this set a few days ago from Casula Hobbies and after a bit of reading on the history of the cars wanted to correct some minor things to get them more accurate and closer to the prototype. Straight out of the box, this is what you get:


According to a History of RAAF Recruiting Trains by R.I. Merchant (published on SDS' Austrains Neo website), the cars were sky blue with silver roofs. I could also see in a few of the pictures the exhaust for a generator which was housed in the guards' compartment to power refrigerators and other equipment on the train.

I fashioned an exhaust outlet from a spare kit sprue, reducing the size of the end to give it some shape with a file. After drilling a hole in the roof by eye going from photos, this was duly fitted.


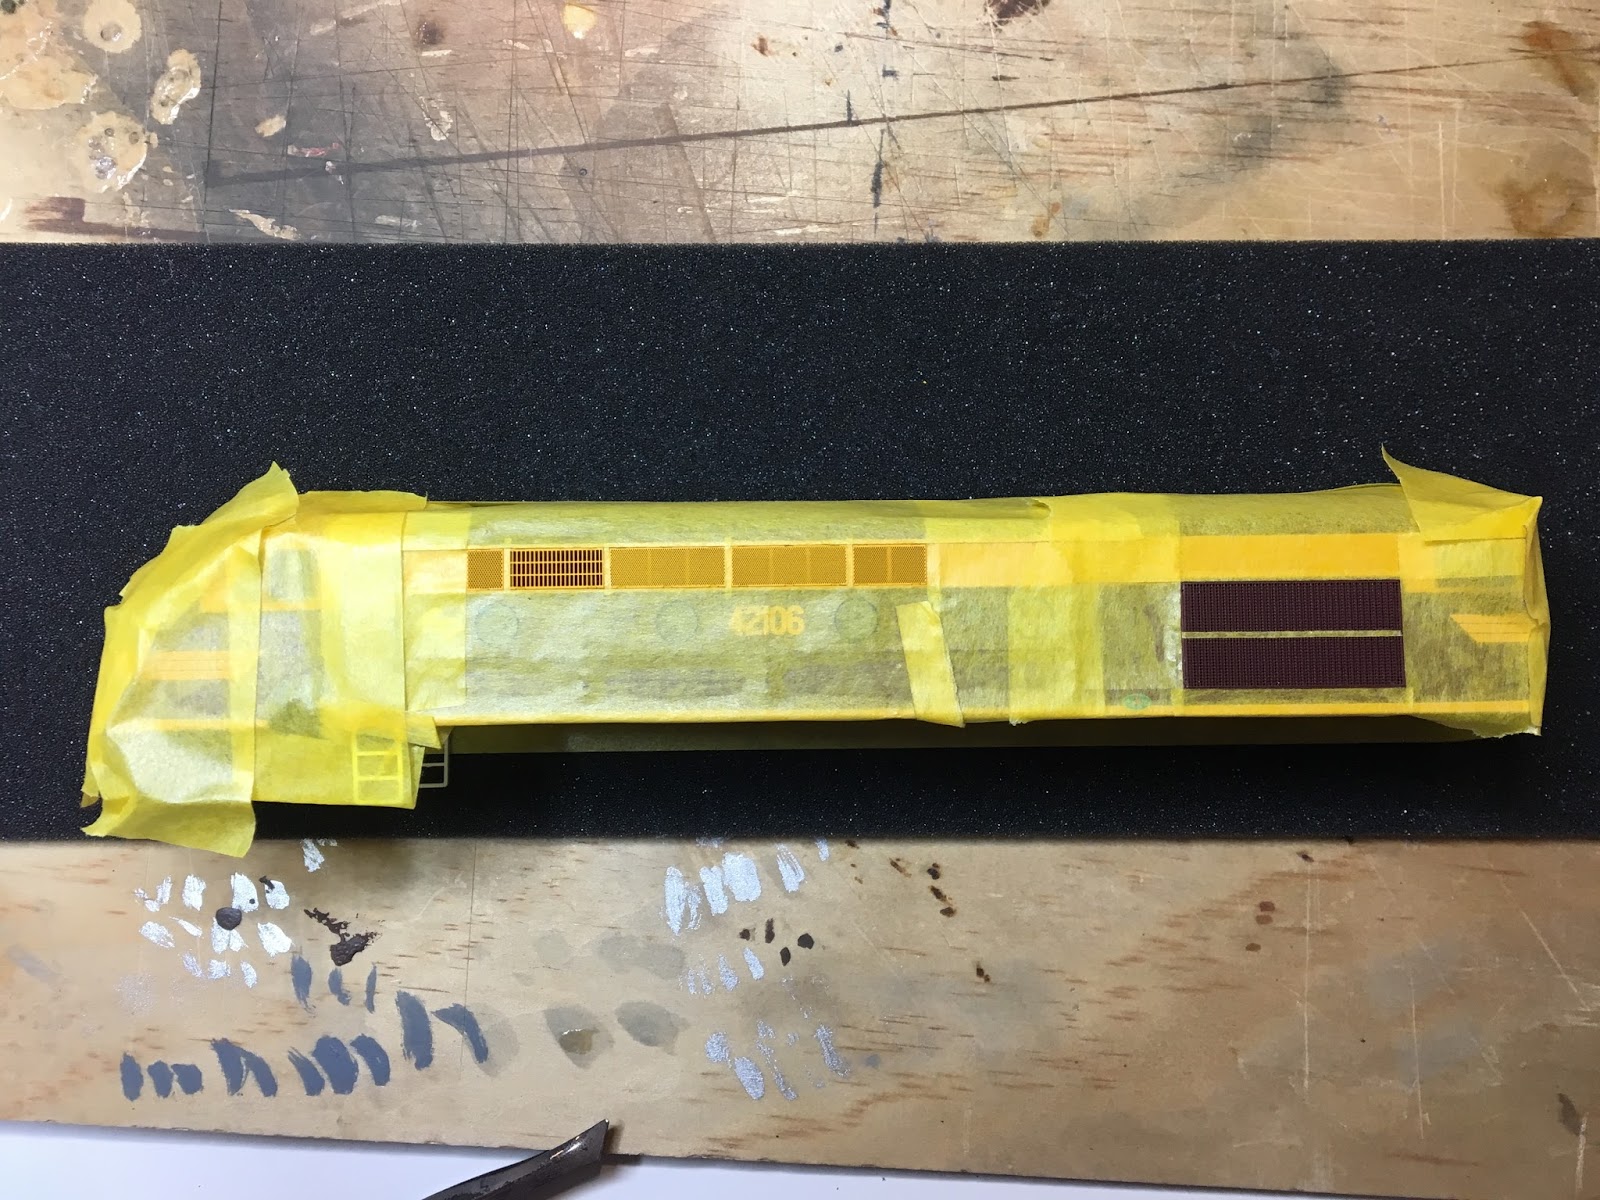
Next the car was masked for spraying. Having learned the lesson of using too much tape on the 421, I stuck the tape onto paper where it would come into contact with the car, save for about 5mm at the top where it would need to stick onto the car.


A spray with Tamiya TS-30 silver leaf and voila!


 The detail of printing on these cars is very fine.


I finished masking and spraying the other two cars this afternoon and now the whole set is complete as per the title photo.
To make it even more accurate, I would need to replace the buffers on the outer ends of the set with the longer type, and fit the cars with hook and link couplers. I've seen the latter done, but I'm not quite ready to jump into that yet.

I'm tossing up whether to make a short diorama for the cars to sit in a siding somewhere, but that would need to come after I've solved the main problem of the next layout.

Until next time, best wishes for the rest of 2018.

Cheers,
Ben

Monday 24 December 2018

Arrival of the Supplementary interurban cars, and the end of another year

On Track Models' Supplementary Interurban Cars

They arrived!


I bought four cars all up and even without taking them out of the box they look amazing. I mentioned in a previous post how MFH2705 (pictured above) is missing a double letterboard to make it prototypical, but if I'm honest, the absence isn't killing me that much that I want to take it apart right now and add a strip of styrene to correct it. As I've said before, this has saved me hours of building my own cars.


I took the cars and one of my 46 class for a spin on a friend's layout a few weeks ago before I left Canberra. The cars roll quite freely and the only difficulty comes when trying to separate them as the sprung corridor diaphragms (which actually work!) prevent the knuckle couplers from lifting up and  out. As we found, a magnet uncoupler is your best bet here.

A friend had upgraded his MUB set(s) with an ESU power pack and passenger car lighting strip (item #50709) as well as the end marker lights using a small length of fibre optic strand off a red LED, and offered to do it for a reasonable fee. With all of my own tools and modelling equipment about to enter boxes and half of the train stuff already in Sydney, I threw money in his direction and received my carriages back within a week, all lit up and running with tail-end red marker lights. All carriages have all been consisted on DCC to run as Set 10, which means I can turn the whole four-car train length of interior lights on together, and the marker lights can be set up as directional. Although by late 1978 these cars were being split up and run in ad-hoc sets on cobbled-together supplementary interurban trains, I like the thought that went into setting this up for me. You can learn new things by yourself up to a point in this hobby, but I've found that the few minutes I've spent learning a new skill or feature off another modeller have been fruitful.


Above: 7305 takes set 10C around the metro goods and return to Central, thus providing return guard's accommodation for the return leg of a morning interurban service.

One less car to build
Another friend recently built MFS2146 as per the AMRM article from a few years ago and offered to build me one as he enjoyed the process so much. I dropped off a donor FS car to start the project as the last job on my way out of Canberra up the Federal highway. I'm in no rush, it will be done when it's done and I'll get it back some time in 2019, but this now leaves me with just MFA2706 to do myself before my 6-car supplementary interurban set is complete. That's just made a huge job much more achievable.

The coming of a New Year, and a new layout

I've said it before, but running the trains up and back gets old after a while. Which brings me to the plans for the new year. We've currently moved into a rental while we finalise buying a house in Sydney, or as Scott from the Barcoola blog has suggested - and I wholly endorse - buying a train room with living quarters attached.

I've pitched a few ideas for a new layout in this blog, and I have yet another up my sleeve that may make the cut, but I'll keep that under wraps for now. Although I've got the room dimensions of the place we're looking to buy and tacit approval to claim a room for the sole purpose of model railway #4, I'm hesitant to do anything concrete like buy track and timber until the sale has gone through and the brake lights of the removal truck are disappearing down our driveway.

There's good things ahead in 2019, and not just from RTR suppliers. Some things I'll actually build myself.

And I'll finish those damned meat wagons...

Until then, thanks for following this year.

Merry Christmas,
Ben

Friday 2 November 2018

The panel lining miracle

Recently I learned about a Tamiya product that has been around for some time - Panel line Accent Colour (pictured below).

It is super-easy to apply and works by gently dabbing the fine brush attached to the lid of the bottle onto the recessed surface of your model and letting the liquid run along the lines by capillary action.

Military modellers, as usual, have been using it forever, but I was impressed with the results I had seen on Facebook among other NSWR modellers. After buying some having a go myself, I'm converted. It makes one of the stages of weathering so easy. Here's an example of just applying black panel liner to my 73. I haven't applied a dull or gloss coat at this stage, it's just straight out of the bottle and onto the model.

Before:


After:


I looked for other wagons to try it out on. After seeing photos of WAGR WGX open wagons running on western line trains during my era I decided to buy a pack from SDS at the Liverpool exhibition. I've seen some really good weathering effects by US modellers on yellow-liveried wagons, so I was also keen to replicate some of these techniques myself. I might yet invest in a WAGR WGV van, but for now I'm pretty well off for 65' and longer louvre vans, with 3x JLXs, 1x KLV and a VFX on the roster until the layout size grows.

Actually, that's only five wagons. Dangerously low I'd say.

Sorry--panel lining.

I've been having trouble recently getting the right consistency of acrylic washes. My mixture of 3 parts water, 1 part 100% isopropyl alcohol and 0.5 part paint has seen the paint want to stay together and form little droplets, rather than 'run' in a thin sheet across the model as I want it to. Until I've worked that out, the WGX appeared as a great candidate for panel lining. Here's before and after shots, just using dark brown:


You could stop there and just dullcote it to take away the shine, but to my eyes it needs a coat of powders to tone it down a littler further. We'll see.

Work also continues on the MFA, however for whatever reason I just can't get the urethane sides to glue together with CA glue. That project has frustrated me so much this week that I've boxed it up and set it aside for the time being. I've got just under two months until the removal van arrives to collect my things and take them to Sydney, which will pretty much stop my modelling activities for the rest of this year. I plan on using that time to complete the following jobs:

-finish weathering the NRY
-finish weathering the HGM's wheels
-panel lining and lightly weathering an MRC

It's a short list but between moving and looking for a railway room with living space attached, talking to banks etc., modelling time is at a premium.

Until next time!

Cheers,
Ben

Sunday 30 September 2018

The best news I've heard all year, and a tiny amount of actual modelling

First things first, I bought the Rav4 I was looking for a few weeks ago and now have a trusty steed to much more comfortably lug my trains to and from exhibitions and the all-too-frequent house moves. That's one less hurdle out of the way.

Now for the big news:


Image credit: On Track Models
Just before the AMRA's Liverpool Exhibition, On Track Models announced the release of NSW Supplementary Interurban cars. I grabbed a few photos of my own from the OTM display case at the exhibition yesterday.


I reckon every modeller has their obsession loco/carriage/structure/prototypical aspect which they've read more about than the rest of their hobby out of a genuine interest or curiosity in that special topic. For me, the obsession is Supplementary Interurban cars. These are an absolute must-have for me, and typify the passenger stock of the NSW railways of the late 1970s era I model. Having read extensively and collected just about every photo of the cars that pops up on the internet and in Facebook groups, I've noticed a small error in the production sample of MFH2705. The prototype MFH2705 had a double letterboard (runs horizontally along the carriage side below the roofline and above the top of the windows), whereas the OTM version of MFA2705 has a single letterboard, which is typical of all of the other cars with the exception of the original MFH2703. If it's present in the production run, a mistake like that would be a deal breaker for some modellers. Yet for a production run to make money, I expect that the number of body variations per carriage type would need to be minimal to be worth doing at all. For me, everything else about the car is fantastic. It's even liveried in the post-Granville numbering it wore when it was paired with MFA2706 into Set 10C. Given that the rest of the MFHs had single letterboards (again, excluding the original MFH2703), I suspect this was a small corner to cut to get the project into production. And personally, I'd rather buy a 'close enough' car that I can take to the cutting board if the inaccuracy becomes too much to bear, than build one myself from scratch.

So, I've already ordered two packs from the good gentlemen at OTM. They are going to look fantastic running around behind Auscision's soon-to-be-released 85, and my existing 46's. Word on the street is that these cars are 6-8 weeks away, so definitely here before Christmas!

Partly to maintain to myself that I can still produce a model if I want to, and partly because seeing OTM's upcoming cars has inspired me, I've resumed building MFA2706 with the aim of having it ready to join the fleet when the other supplementary cars arrive. So far I've removed the excess length added to protect the castings from shrinkage during production, and am currently sizing it up to get the right length to fit on a Lima chassis. I've bought 2CA bogies from Auscision to put under the car to represent how it looked after returning to service following the Granville disaster.

  
Other news from the exhibition relevant to this blog was the announcement from SDS models of the release of the series 1 and series 2 ICX container vans. These normally carried a refrigerated RACE container, or milktainers, which has prompted me to write to Road & Rail Resin to obtain another couple of milktainers.


It's almost warm enough to start spraying primer and painting again, so probably a good time to finish my existing ICX kits and the milktainers for them before the end of the year too.

There were also painted samples of SDS' upcoming 81 class. It's missing number boards and a cab, but it's going to look great in front of the Southern Aurora cars.


Until next time!

Cheers,
Ben

Saturday 1 September 2018

Chullora Industrial update and some more weathering

 Chullora Industrial

A few months ago a put up a post about the next layout I want to build, Chullora Industrial and included an initial track plan. I wasn't quite happy with that version in that the loco had to leave the scene to shunt most of the sidings, so I lengthened the layout out to 175cm and moved the set of points for the rear-most siding further into the layout to overcome this. Here's the revised plan:


I also moved the fiddle yard to attach at a 90-degree angle while at home, both because it wouldn't fit in the room otherwise, and because I wanted a bit of a longer run before ending in the fiddle yard again.

Although I've got a standard-sized bedroom to work with, the limiting factor for the dimensions of the layout is getting it all into the back of a Toyota Rav4 in one piece. Which brings me to where we're going next for this layout concept; pulling up to double reds with the slim chance of calling on. First hurdle: buying said Toyota Rav4. (I needed a new car, this just happens to be the type I can get trains or two mountain bikes into with ease). That problem will be surmounted before the end of September, but finding a new car over the last month or so really flattened the bow-wave of motivation that had until recently driven me to purchase new LED lighting and points for the layout over the last few months.

The second hurdle has been the confirmation that my job is moving me back to Sydney, and that my wife's job is simultaneously sending her north on a secondment for half of next year. We just can't win! Having lived apart this year due to my work we'd largely put our plans for buying a house on hold, but with the prospect of being just as unsettled for the next 12 months we figure "why wait?" So now we're actively house-hunting. And yes, one of the key criteria for me is having enough rooms in the house to sufficiently accommodate train room, as well as a family. Priorities.

So, with a house comes an opportunity to put our roots down for a while and stay in one spot. It also means being somewhere long enough to build a layout where I can finally both run trains in a loop as well as shunt!

For now, Rozelle Street will remain the primary layout, and continues to meet my needs for running trains, and provides a nice photo backdrop for my new stuff and weathered trains as they leave the workbench.

More weathering

Weathering and building kits is probably what you're going to see most on here for at least the next six months, but the benefit is that after that time the fleet of weathered gear will be that much larger.

Speaking of which, I've started to play around with weathering S wagons using the crushed pastel method:


As well as starting to weather a Eureka HGM:


I had the opportunity to run them around on Allan Brown's "Bullinga" layout recently too. It was quite satisfying to watch the trains run further than 1.4m!


Above all though, the layout building pause gives me the chance to finally start on some meat wagons. Like I said I would, years ago.


Until next time!
Cheers,
Ben

Saturday 28 July 2018

Pre-exhibition weathering

Whenever I go overseas with work I have great aspirations for all the writing/model railway planning I'm going to do while I'm away. And each time, at the end of those days my residual mental capacity is enough to watch TV or sleep. Hence, it's taken a little longer than I'd hoped to put up a post about the wagons I'd specifically weathered for the Rosehill exhibition.

As promised, here is that post.

BDY

These were introduced to the NSWR from 1977-1981, and I wanted to represent a wagon that has been in service for no more than 3-6 months in keeping with my era. After spraying the model with dullcote, I used a wash of Model Master Roof Brown Flat (3 parts water, 1 part 100% isopropyl, 0.5 parts paint), applied in 3 layers. The wash shows up best inside the wagon, but you can see the brown in places on the ribbing of the body panels. I could probably increase the paint ratio a bit more, but when applying this wash to some 20' RACE containers I had found that too much paint caused the wash to pool into droplets. This consistency seems to have mitigated that. It will just need more layers in future.

The main attention was in dirtying the wheels and bogies. Using a wheel mask, I sprayed the wheels with Krylon ultra flat brown, and then applied powders as per the crushed pastel method, giving the bogies a stronger covering of light greys and light browns, as they tend to pick up more than the body. After enough layers of powder had been applied and sealed with iso, these were then sealed with dullcote, diluted with thinners and sprayed through the airbrush at around 15 psi, as I've found the rattle can is a bit too strong for this step, and can blow the powders away.


I like the look on the prototype wheels of the grime and dirt on the face of the wheel, contrasting against the shine of the tread where it contacts with the rail head. To achieve this on mine I removed the overspray and weathering from the tread using a cotton bud dipped in 100% iso, and rubbed gently on the tread on each wheel to clean it up again. I changed the cotton buds fairly regularly too in order to keep the tread completely clean and prevent smearing brown back onto a part that had just been cleaned.


It doesn’t look like anything’s been done to it until you put it next to one straight out the box! That said, the next one I do I think I'll go a little heavier on. The next one will also have a tarp and ropes. That should be a good little weekend project between now and the end of the year.

JHG

The JHG was weathered just using crushed pastels, and although it looks too strong in the first photo, the dullcote has toned it down to a more prototypical level. I used maskol for the windows as well, after success using it on the 421.


As the bogies for this wagon include copper pickups for the marker lights, I masked the area where this contacts the bogie so that it would still provide a good electrical connection after re-assembly. Despite this, and cleaning the wheel treads as with the BDY, the markers aren't illuminating still. I may have to play around this but I'm sure it's just a case of removing paint/dullcote from where it shouldn't be. A next weekend job.

Still, I'm happy with how the body has turned out. Next time, I would add a little more orange/brown to the roof for rust, but only subtly. 

WHX

I also took the opportunity to refresh the weathering on this WHX by touching up the pastels. This is one of the first WHXs I'd done and I had removed a fair bit of the grey powder with my fingers after picking up when I was still getting used to the process and hadn't sealed it properly. It had been irking me ever since, so I felt I couldn't run it at Rosehill without fixing it. One of those lessons you need to go through as part of the process of a learning a new skill.

Other news

As expected, my Auscision 48 turned up while I was away. I still haven't even taken the plastic wrapper off it yet, but I'm looking forward to giving it a run on Rozelle Street this week, particularly to hear the DCC sound file. It'll be nice to plonk it straight out of the box with all of the features I want, rather than having to send another loco away to get it to operational stage or to have sound added. More on that next time.

For now though, it's nice to be home.

Cheers,
Ben

Thursday 14 June 2018

Rosehill Exhibition

As I don't belong to a club I normally can't go to an exhibition without taking my own layout, much less turn up to run trains for just one day. As a solo modeller this makes it hard to block out an entire weekend more than once per year, let alone a long weekend. Last weekend, I got one a rare opportunity to run trains with minimal effort on my part.

One of the ways I stay connected to and inspired by other modellers is through a Facebook group called New South Wales Railways Diesel Era Modelling (NSWRDEM) or just DEM for short. The group focusses on the period between about 1975 and privatisation in the early 2000s on NSW railways. The Epping Model Railway club very kindly allowed our group to run our models on their Binalong layout for the whole weekend. All up this required about 15 or so operators over the three days. As I could only commit for the Sunday, contributing as part of a bigger group suited me well.


Stock had to be weathered or modified or kitbashed - i.e. no plonking! While there's a place for ridiculous consists - a tuscan-liveried XP power car hauling freight on the metro goods lines for example - it was nice to have a serious collection of models running in the one spot. Aside from 42106, I weathered three wagons specifically for this exhibition, and I'll do a post specifically about them at a later date.


After the first few laps running the consist around I found that the CKF bounced around too much going over joins in the fiddle yard and so it was taken off. This is something I don't experience on my shelf layout at low speeds. The EMRC has a rule that you take a troublesome wagon off to fix it and if it still doesn't work you pack it away. Smart rule.


Later I added one of SDS models' new 10,000 gallon tankers to the consist, and despite it being unweathered it fit in reasonably well.


I was really happy with how 42106 ran too, given that I didn't have anywhere to test run it after weathering.

Image credit: Aaron Hobson

It might be personal preference, but most of the modellers had freight stock rather than passenger. Perhaps freight stuff is more versatile across a variety of layouts, doesn't take up as much space and fits in just about everywhere on a railway. And yes, I am still planning on building the MUB set. All in good time.

Stepping aside from the NSW theme briefly, Murray Bridge had travelled all the way from SA to be at the exhibition too and was spectacular to watch. A combination of detailed and weathered locos and rollingstock passing through the scene at realistic speeds make this an exceptional layout and one you really need to see in the flesh to properly appreciate. An absolute credit to you Scott.


In chatting to him, I joked that Scott had added an operational inglenook cameo on the river flat. Turns out it actually does operate, which is a great touch.


Speaking of Inglenooks - Gary Ruming's new Tomlin's Creek layout made it's debut at Rosehill too and looks outstanding.


The new venue at Rosehill Racecourse was the most comfortable I've been in for an exhibition too; no draughty winds, not too hot or cold despite having a huge wall open to the elements, and with plenty of space away from the exhibits to sit down and eat. As much as I enjoy the Liverpool exhibition, I don't enjoy having to Genghis Khan half a table just to sit down when I want to have lunch.

Straight after the exhibition I headed overseas with work and it'll be a while before I get more time for layout building and modelling. Seeing the layouts, running trains and chatting to various model railway friends old and new was refreshing given the bulk of my interactions are online. I've taken a few ideas away and the exhibition has spurred on some creative juices. I've recently revised the track plan for Chullora Industrial and so when I get a break again I'll post both an update on that and some further detail on the wagons I weathered for this weekend too.

In the meantime, happy modelling!

Cheers,
Ben

Saturday 5 May 2018

Weathering 42106

I’ve long wanted era-specific motive power to haul my Southern Aurora set, as well as something that wouldn’t look out of place on the goods lines in Sydney. So last weekend I ordered 42106 from Australian Modeller and it turned up on Monday. So as to not just go out on a whim and buy whatever I like, I justified this purchase to myself with the commitment to weather it before I could get too attached to the clean livery look. And with my wife on night shift this weekend it was the perfect opportunity to swap power tools for the quieter paint and air brushes!


Throughout the next few hundred words, I’ve used the crushed pastel weathering method I’ve referred to previously for the GLX, PCC and WHX hoppers. Follow the links for further info.

I’m an instructions and pictures kind of guy and so in case it benefits anyone else out there, here’s the list I followed over the past few days. I started masking on Friday and finished re-assembling the loco after lunch today (Sunday), so all up it didn't take too long, especially considering that there's a lot of 'firsts' to learn in this process.

·        Remove body from chassis.
·        Mask windscreens, headlight, marker light and porthole windows.
·        Remove bogie sideframes from bogies. Add to items to be sprayed black.
·        Remove couplers, store in safe place.
·        Mask electricals and staff exchanger on chassis.
·        Mask yellow treads and yellow warning ends on buffer beams.
·        Dullcote body.
·        Spray bogie sideframes Krylon ultra matt black.
·        Spray chassis Krylon ultra matt black
·        Remove masking from yellow treads of chassis and dullcote.
·        Mask grills on body.
·        Spray/paint grills Krylon ultra matt black.
·        Weather body with overall light grey to fade paintwork. Seal with iso. 
·        Weather body with patches of black/brown road grime. Seal with iso.
·        Weather chassis with grey brown. Repeat as necessary. Seal with iso.
·        Weather fuel tank area to specific pattern.
·        Weather tops of both buffer beams a light, dirt brown. Iso.
·        Using a light grey pastel pencil, draw impact circle on both buffer beams.
·        Brush light coat of both black over buffer beams. Iso.
·        Using airbrush, spray model with dullcote (3 parts thinner, 1 part dullcote). Leave for 1 hour to set.
·        Clean wheels using iso and cotton buds, and a 9v battery to rotate the wheels.
·        Re-install couplers – replace with Kadee 158’s if desired.
·        Re-attach bogie sideframes to bogies.
·        Replace body on chassis – remember to re-attach headlight connection.
·        Remove maskol from windscreens, portholes, headlines and marker lights.


And after all that – voila!


A few observations:

Reference photos are a must, and I spent most of the weeknights last week trawling through photo groups on Facebook and in my own library to find examples from multiple angles. I ended up with about 10 photos from between 1978-1983.

Maskol was easier to use than I expected. I was impressed that when I went to remove it the whole gloop would stay in tact, much as if you were stretching a latex glove. This allowed me to carefully pull from the right angle on the windows with mirrors or windscreen wipers, to coax the maskol off from underneath it, much like when you finally get the hang of removing one of those 3M adhesive picture mounts from a wall.

Masking the loco body with tape so that I could paint the grills with the Krylon black left a bit of a residue on the dullcote and paintwork which I had to clean off with iso and a cotton bud. I re-applied the weathering over this area on both sides of the body and while it looks ok, it’s not the smooth, consistent pattern I was going for. Next time, I’ll use paper to mask this and hold it on with as little tape as possible.

As the loco isn’t fitted with DCC yet, I was struggling to figure out how to get the wheels to turn so I could clean them as Rozelle Street is solely DCC. After a quick google I found a book by Model Rail’s George Dent which did the trick; press a 9v battery onto the contact wheels to ‘jog’ them forward so that you can clean the next bit. It worked a treat and I now have clean wheels, ready to go for when I next get to run the loco.

I’d read in other loco modelling forums that using Dullcote from an aerosol can to seal weathering could ‘blow’ the powder away because the pressure is too high. So after asking around I settled on buying some Testors Dullcote laquer and laquer thinner mixed to a ratio of 3 parts thinner, 1 part dullcote and applied it at 20psi with the airbrush. The airbrush needs the thinner/cleaner fluid put through it afterwards as the dullcote in this form is quite viscous. After applying, I left the model to dry for an hour outside (18 degrees) and apart from a mild toning down of the weathering scheme it seems to have done the job well. If I weather again I'll go a little stronger with the colour scheme to compensate for this tone down effect.

So there you have it - 42106 is back at Rozelle Street looking a little dirtier, but still schmick enough to be a running contender for pole position on the outbound Southern Aurora.


Now that I’ve bit the bullet and successfully weathered a loco without ruining it, I’m keen to do another. The X200 looks like it’d be a good next step…

Til next time,
Ben