Sunday, 28 July 2019

Mt Wilson update - 3 months' worth of progress!

I'm a big fan of smaller layouts; less track and fewer baseboards to build means trains are up and running much sooner.

So here we are, three months into the build for this layout and it's progressing just under the pace for Rozelle Street, which I'm taking as a good sign, as this layout has additional turnouts and some new electronic gear added. I've now finished all of the track wiring, and have installed and configured all of the turnout servos.

The most painful installation of Servo's, ever.

I was having some trouble getting the throw to align correctly while fitting most of the servos. I opened out the holes underneath the throw-bars to make things easier, shifted the servos and played around with tweaking the end points of the throw using the decoder, but I was still getting that horrible grinding sound in some cases, and eventually, the white arm just fell off, taking the piano wire out from the turnout with it.

Turns out, I forgot a screw.


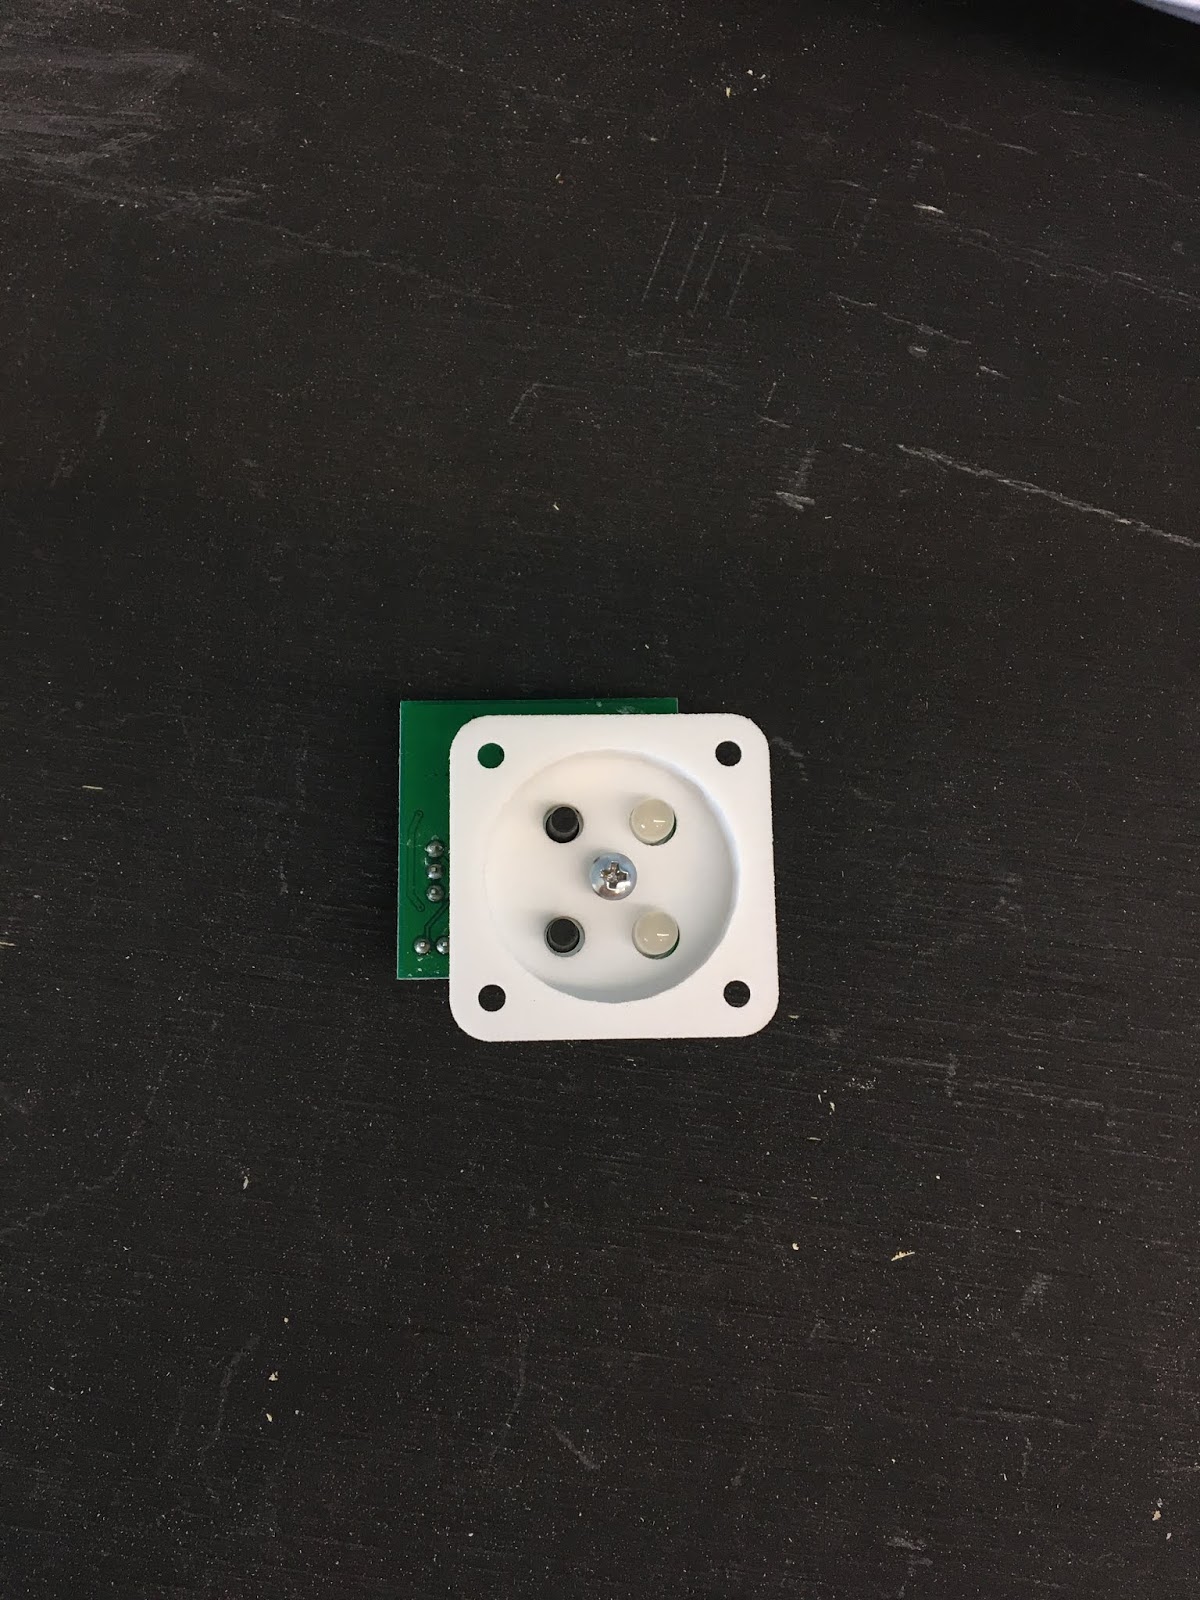
Or more accurately, a number of screws. In the picture above there is a screw to hold the plastic arm onto the servo, and another to hold the servo onto the mounting block. I double-checked the instructions and found that it didn't actually identify that a screw was required to hold the arm on. I only learned I was doing it wrong when, frustrated, I took one of the servos over to Rozelle street and compared what I'd done there previously.

For reasons I can't fathom, only two of the servo decoders will display the fascia panel LEDs in the configuration I want to; green for the direction of alignment, red for the closed route. I've tried moving the jumpers around, re-setting the factory settings on the decoders, everything. In the end, the servos work, the points change, the frog polarity changes, and there's power where there needs to be on each road. I've locked the decoders to further adjustments, so job done, moving on.

The first train!

With the completion of wiring I got a train out to test how my concept for operating sessions will work. Being fitted with a keep-alive, the X200 is the most tolerant loco I have to shoddy trackwork, so I probably should have gone and grabbed the 73 class, but this will do for now.


I ran through a sequence of bringing the coal train in and shunting it into the colliery siding. It's nice being able to stand back and enjoy the fruits of your labours! Also, all of the double and triple-checking I'd done for clearances for running around and siting the uncouplers seems to have paid off, with no issues found.


I did discover that I'd forgotten to install an uncoupler on the main to facilitate shunting the coal wagons into the colliery siding, but luckily I have one more uncoupler left, so that will be another job in the near future.

Other developments

After much um'ing and ah'ing I've decided to wire the uncouplers onto an accessory bus, rather than the track bus. Rapido recommends 12V DC with a minimum of 500 mA. I've read in some user reviews that people were needing to use at least a 1 Amp system to get the uncouplers to throw, so I picked up a 12V 1.5 Amp power adaptor from Jaycar, and wired up an example today to see if it worked.


An audible 'clunk' tells you the uncoupler is working once thrown, and mine seems to be working fine with the 1.5Amp solution. Now that that's a proven concept, I'll have to wire up all six of these in due course. Another job for the next few weeks, before we even get to installing them and hooking them up to the accessory bus...

I've also come up with how I want the colliery loading bin to look. The main components will come from the Ratio 547 coaling tower kit, and I've assembled about half of it already, and put it in place to get an idea for the look and feel.


Electric locos won't be permitted under the loading bin, but will still be able to access the branch for shunting and departing from the yard.


I'm happy with it so far, but I'll extend the bin and add a covered conveyor belt from the mine, which will disappear into the rock at the back of the module.

As always, here's the overall view. Adding a few trees and buildings has helped visualise where I want everything to sit, and I'm happy with how it's coming along.


In other news, Auscision has announced that the 85's have arrived in the country and will be sent out within the next fortnight. I probably won't post again until after I've received mine and taken it out of the box for a run. I may also have another addition to show off around the time of the next post, but we'll see. I'm aiming to have the uncouplers and fiddle yard done by September too.

Until next time!

Cheers,
Ben

Sunday, 14 July 2019

Mt Wilson update


All of the wiring and electronic components have now arrived so I've been moving ahead with the layout again.

First up, I had some valued help from my brother in installing the roof, pelmet, end braces to the layout, which allowed me to install the lighting.


I've installed two pairs of strips of lighting this time owing to a wider baseboard and roof than on Rozelle Street. As you can see with only the single pair illuminated above, it's a little dark in the far corner. The photos below show the effect of the second strip (bottom picture) compared to the single pair.


With this step complete I then glued the track in place with PVA. I had spent the last few weeks marking out on the board in pencil where all of the turnouts are, where the frogs sit and the general alignment of the track, so that once I'd removed it all I could drill out holes for the frog wires to the hex juicer and the turnout throw bars from the servo motors.

Just about everything within reach was borrowed to hold the track in place while the glue set.


After I'd glued the track down and started wiring it, I realised that I'd forgotten to snip the wires on each Peco turnout that connect the switch rails to the frog. That will have to be a dremel job before I finish wiring.

Next came the Rapido remote uncouplers. I purchased a hole saw for this job and I was slightly apprehensive about drilling up from underneath the layout and inadvertently taking out some sleepers if they caught on the saw blade. Going slowly and steadily though I only took out two sleepers on the last one out of five holes in total, and that was probably out of trying to rush to finish. Needless to say, there was an enforced break after this.


I've used Peco Code 75 points and Micro Engineering Code 70 track. Peco is also bringing out Code 70 track and points, but I can't find it online yet. I've found that both brands of metal track joiners work between the two codes of track fairly well. The Peco ones are definitely the more forgiving of the two. 


Above is the Rapido uncoupler test-fitted in place. I had a go manually turning the whole unit in the hole and running a coupled JLX and BP tanker over the top, and I'm impressed already. If it's this successful when wired up I might be investing in a few more of these! These are especially going to make uncoupling under overhead wiring that much simpler.

Also in one of the boxes of goodies to arrive in the post were some fascia mounting panels for the Tam Valley Servo switch. These are the first 3D-printed items I've used in layout building and once I've primed and painted them (waiting for that confluence of spare time and an ambient temperature above 18 degrees to enable some spraying!) they'll come up nicely.


The only downside - and it's solely a fault of my planning - is that I can't mount the fascia panel straight in the frame of the layout due to the way the printed circuit board lines up offset from the panel. I'll have to plan this a little this week.


Before having to stop for the weekend I did manage to get a few roads on the right-hand side of the layout wired up to the track bus and finished with heatshrink to neaten the job.

Bit of quick one this time, but I will have another go next weekend and hopefully finish the minutiae of wiring tasks.
Cheers for now,
Ben


Sunday, 23 June 2019

Progress and taking in other people's layouts

A fair bit has happened since the last blog and I'm confident that I've almost got enough of the bits and bobs to further progress Mount Wilson. Until then, here's what else I've been doing modelling-wise.

NSW Diesel Era Modelling Day

Every year, the NSW Diesel Era Modelling Facebook group are very generously loaned a layout from the Epping Model Railway Club to gather and run on. It's been going for four years and as I've missed all of the previous ones I was determined to get there this year.

This year EMRC loaned Binalong with it's dual DCC and DC operation, and the new owners of Stockinbingal generously brought that along too. I can remember seeing this layout at the AMRA Liverpool exhibition in the 1990s and marvelling at how detailed it was then. Naturally, this was where I wanted to use my allocated path for the day.

I brought 42106 out again with a short wheat train. What seems huge on a 1.5 home layout is dwarfed on days like this!


Marcus Ammann's Main North layout

I was also lucky to be invited to run at Marcus' Main North layout (blog here, including a video walkaround of the layout) along with a few other modellers. It is a seriously impressive space, over 3 levels with no helix.

All of the crossing loops are steam-era sized, so my shorter late 70s-wheat train (with 48 kindly loaned from Marcus) parked to let a number of the larger diesel-era trains pass and cross, which made operating the layout a lot more realistic and a lot of fun. Add working signals, block detection and DCC sound-equipped locos to the mix and it just increases the play value.

Passing through Ardglen:


Dropping down grade from Murrundi to Broadmeadow:


Apparently it took him 28 years to get to this stage. It would be nice to be in the one spot for that long build something similar!

While I was there I took the opportunity to ask Marcus a heap of questions about DCC, particularly about accessory wiring and circuit protection. He made a good point; for a layout with a single operator there's not much need for an accessory bus as you're going to be running one or two trains at a time and you'll be able to fault-find fairly easily. More importantly, a single operator doesn't have to worry about the disruption to other operators caused by a short. Summary: just use the track bus for accessory power.

This is exactly what I've done on Rozelle Street, and it's worked fine. To reinforce the point, Marcus' Main North layout has just a track bus and power districts. It seems to work fine for him. As usual, I was about to over-complicate what would be a very simple branch line layout.

Mount Wilson Progress

Lastly, progress on Mount Wilson has been positive. Firstly, I've bought all of the turnout servos, another frog juicer, another power pack, an NCE panel interface for the PowerCab I've already got off Rozelle Street and fascia panels for the servo controllers. I later realised I've bought the wrong fascia panels for the servo controllers, so they will be going back to MRRC and be replaced with the right ones from Ray Pilgrim's Signals Branch on Shapeways.


I've also decided to not use underlay on this module. I didn't use any on Rozelle Street either and haven't had any issues with it, and nor do I run trains fast enough to get much of a reverberation audible over the sound-equipped loco running at the time either. I will stick with powering the point frogs though. I own a number of short wheelbase shunters and find that a powered frog and/or keep-alive devices improve performance of these locos at low speed.

After playing around with the magnet uncouplers I've also decided to bite the bullet and buy Rapido on/off uncouplers, which are now also on their way here. Going to be a lot to do when the postman turns up!

So I'm up to here: track cut and ready to be glued down, lighting tested and waiting for the roof to go on, and a mock-up of the initial landform and buildings.


After getting some ideas from a presentation on coal mines in the Lithgow region at the MRNSW Convention back in May I've also decided to change the coal loading method on the coal siding from front-end loaders to an older, overhead bin. More on that in a future post.


Once I get the roof on and the lighting installed I'll lay the track, wire it up, and test it all. The Auscision 85 class is on it's way so I have a bit of a deadline to work to.

Til next time!


Tuesday, 21 May 2019

Magnet uncoupler testing

I mentioned in the previous post about contemplating ordering some of Rapido's Railcrew uncouplers to use on Mt Wilson so that I can have non-permanent uncouplers and trouble-free running. 

Before investing a fair chunk of modelling money into postage from Canada, I thought I'd have a go at testing whether I could replicate the same design concept the Railcrew uncoupler uses with a view to building something similar myself. I bought a 6-pack of 12mm x 3mm rare earth magnets from Bunnings and built a quick test bed from some offcuts of timber and tape.

From left to right are two magnets aligned parallel to the track, then a coaster of roughly the same height to create a level area for the track to run over, then two magnets separated from each other by 1mm of tape, and finally two separated by 5mm. I wanted to see if there was much difference in having the magnets further or closer apart.


The first test with the magnets 1mm apart worked well, uncoupling the TRC and MRC from each other.


Same with the next pair, 5mm apart from each other.


And as predicted, the magnets arranged in line with the track didn't uncouple the wagons. They did push the coupler release bar horizontal though!


I'm planning on using cork on Mt Wilson, so I though I would try out putting the cork coaster between the track and magnets. The couplers appeared to be too far away for it to work.


Time then to test out the on/off function of my plan by taping two of the magnets to the coaster and running a few wagons over it. The photos explain the results.


So that works. I've learned that the magnets need to be right under the track to be strong enough to uncouple the wagons, much the same as Rapido suggests for fitting their uncoupler. Now to work out how to make my own. I'm not particularly confident with electrical wiring despite having muddled through it for Rozelle Street, so I don't really want to operate these via servos if I can avoid it. I'd be ok with a push rod or something similar, provided that I can design it so that "off" is with the knob flush against the fascia so that it doesn't get bumped in transit and as a reminder that the uncoupler is active. More thinking required.

In the meantime, I spent a few hours painting today.


Next job will be tracklaying and wiring, and I'll add the roof and lighting after that.

Cheers,
Ben

Tuesday, 14 May 2019

Construction Progress - uprights

Phil Collins asked after the last blog post I put up if I could post some additional photos of the rear of the model to get an understanding of how that structure is supported and kept straight.

Happy to oblige!


We spent a lot of time lining each of the vertical pieces up with the level before to ensure a 90-degree join before attaching it with screws fed from inside the framework for the middle two, and attaching the outer end uprights to the end of the layout frame.


We then cut a notch in the top of the backboard, and filed and sanded the opening for each vertical brace piece to feed through and attach at the rear, as shown in the photos.

I'm concerned that there's not enough strength in the horizontal pieces supporting the roof of the module to maintain to 90-degree angle over time, so to provide additional bracing and to visually separate the scene from the fiddle yard I'll add a 9mm pine panel at the left-hand end of the module once the track is down, the turnout servos are installed and all of the wiring is finished. You can see in the last photo that all of the parts at the end of the module finish flush to enable this panel to attach easily. On the right-hand end (pictured) I'll add a 9mm pine panel cut into a 'C' shape to brace this end.

My Engineer brother assures me that I've successfully over-engineered this to beyond what it actually needs to be strong (something about clients being pedantic and not trusting physics), so it should provide many years of fun.

Until next time!

Cheers,
Ben

Sunday, 5 May 2019

Mount Wilson construction progress

As promised, here's the next installment discussing the construction of the my Mount Wilson Layout.

By the end of the Easter long weekend, the layout frame, baseboard, legs, supports, and backboards were connected and we had cut all of the remaining timber. All up, around 20 hours of effort produced this:


Thanks again to my brother for getting this far. Reaching this stage has been quicker than the same phase of construction of Rozelle Street and it's impossible to do by one's self.

I've replicated the baseboard, folding leg and leg bracing design I developed for Rozelle Street, mainly because they work and in three years and two exhibitions I've never had a problem with them. 

The biggest change to the design on this layout has been having a fixed backboard and fixed uprights made out of timber instead of aluminium. This is mainly because I want to transport the layout as a in a state that requires as little assembly and disassembly as possible. I couldn't figure out a way to get the uprights holding up the backboard to be permanently fixed to the timber without getting some heavy-duty fastenings around the back, so I've stuck with timber. I'm very aware that paralysis by analysis has preventing me from making a start to some jobs in the past, so the KISS principle is being followed as much as possible.


Once I got the layout home I mocked up the basic track plan to get an idea of how everything looks before I start making irreversible changes to the boards. While I'm painting the boards and until I receive all of the components for the LED light strips, I've decided to leave the roof of the module off, as well as the front pelmet and left-hand side backboard that will also eventually be attached. 

Mocking up the layout with the turnouts and rollingstock I'm going to use has given me really useful indications of things that don't come up in the track planning software, like whether the radius of the curve on the platform road needs to be smoothed out so that the MUB set cars won't look toy-like as they arrive into the station. Ultimately the platform will hide the curve from view, but it's worthwhile marking out where everything is.


The other thing I wanted to check was whether the run around is long enough to fit 4x CH or CTS coal hoppers plus a guards van without fouling the adjacant tracks.


So far it looks as though this will worth, and there's still a comfortable 220mm at either end for running a loco around. The 46 class measures just over 180mm long (I've rounded this down and measured over the loco's headstocks), and the soon-to-arrive 85 class measures just over 200mm long (also rounded down and over headstocks). The biggest loco in my fleet will be an 81 class, and while it will clear the nose of the turnout on the headshunt at the far end of the layout on the rare occasions I can find an excuse to bring it out, it's going to be very tight at 230mm long. The 48, 73 and 49 class are all smaller than a 46 and will have no trouble.


Other projects

I'm also currently looking into developing an on/off uncoupler using magnets. Not an electromagnet, but a system of shifting the uncoupling magnet out of the way when not in use. The neodymium magnets I have on Rozelle Street work well, but they are constantly 'on' and can uncouple wagons in the middle of a train as you're trying to drag the completed shunting puzzle out to the fiddle yard. Very embarrassing at exhibitions or when you have friends over to run the layout. At the same time, that spot on the main line is exactly where I want an uncoupler too, particularly for Mount Wilson when operating coal trains.

Rapido Trains developed their RailCrew uncoupler system a few years ago which works on the principle of shifting the magnet off-alignment from the track when you don't want to use the uncoupler. I haven't seen them for sale here in Australia, but here's their promo video in case you haven't heard of this product before either:


The only thing I don't like about the Rapido RailCrew uncoupler design is the LED in the middle of the track, however you could probably paint it black to blend it in with the ballast. I'm sure I can come up with a device that rotates two neodymium magnets to align perpendicular to the sleepers and parallel to the track, controlled by a cog or rod linked to the fascia to achieve the same thing.

I may just end up throwing money at Rapido if it gets too hard, but we'll see.


Haven't figured out how to replicate overhead wires strung from telegraph poles yet either, but that's on the cards too after I've got the track wired and basic scenery down.

Whistle out

Next job is to paint the structure so far and then paint the backboard sky blue. I'll get to that job after the Modelling the Railways of NSW convention at Loftus later this month, and will spend the rest of that weekend working on the layout. At the very least, I want to have the painting and lighting installation complete before the June long weekend so that I can make the most of the extra day off tracking and wiring. Blogging will be slow until then but I'll add photos as the layout progresses.

Until then!

Cheers,

Ben

Monday, 22 April 2019

Introducing: Mount Wilson

So after deciding not to build a layout just yet, this weekend I started building my next layout. The confluence of 4 days off, pay day, the completion of a plan I was happy with, the offer of the use of my brother's arsenal of power tools, and as my brother put it, my "incessant whinging about building a layout" (paraphrased) combined to make quite a productive weekend.

The Plan

Before I get to the description, let's get down to what it looks like.


Concept

In real life, an alternate crossing of the mountains by rail was surveyed in the 19th century, however the grades and earthworks required to build a line from Richmond through to roughly Bell/Clarence were considered prohibitively expensive, and thus the current main western line won out. The real Mount Wilson area is a sleepy hollow dotted with European-looking trees which hide much of the natural Australian bush, much like the rest of the upper Blue Mountains in the more built-up areas. 

In my layout scenario, both the Kurrajong line and the Mt Wilson branch were built simultaneously in the 1920s. Accordingly, the layout will have a pre-cast concrete Pc2 station as was common of lines constructed at that time. Initially, the railway hauled fruit and various produce from the busy Co-op siding to Bell, where it was attached to eastbound goods trains heading to Sydney. The coming of the railway turned the village into a tourist destination, increasing passenger traffic on the line as the road traffic of the day struggled with the grades of Bells Line of Road.
Post-war, the discovery of coal nearby and a surplus of ex-military vehicles made a mine served by road haulage from the valley floor to the railhead at Mount Wilson viable, and a siding was laid for the purpose of loading coal trains in the yard. The grades on the fictitious branch line are still quite steep, which reduced the length of trains which could be hauled up the line by steam. The NSWGR took the opportunity to extend the overheads for the Great Western Line down to Mount Wilson during the 1950s to cope with coal traffic. The whole yard was intended to be expanded to facilitate longer trains, however, well, local hoteliers, a wealthy land-holding family, and state politics. Apart from an upgrade to the frequency of the passenger service, nothing changed.

Fast forward to the era represented: the late 1970s.

The passenger service lives on with mining families sending their kids to school further down the mountains, plus the comings and goings of tourists and bushwalkers. The coal trains are now hauled by electric locos and use modern, pneumatic-unloading wagons of the CH and CTS type. Demands of road and mine traffic in the area is sufficient to require a dedicated fuel siding, and it's still more convenient for the local growers to cart their produce by rail, for now, which they do courtesy of the Co-op siding. As well as fruit, machinery, mine supplies, farming equipment, tar for the local roads, and general goods is deposited and dispatched at the siding. 

Traffic
I plan on having four main types of train on the layout, with each move taking around 10-40 minutes, depending on what I have time for. These are:
General goods - diesel-hauled, with assorted wagons for the Co-op and fuel siding
Coal - electric loco-hauled, 4-car trains of either CH or CTS hoppers plus guard's van. 
Passenger - loco-hauled, 2-car supplementary interurban cars or a railmotor at a later date.
Pay bus - because why not?

This roster maintains the 'instant-on' concept I've enjoyed through Rozelle Street, and it's compatible with an unpredictable work and family schedule.

Here's a teaser of what will hopefully turn out as quite a pleasant scene when complete:


Next time I'll add some construction photos of where we got to this weekend and the overall impressions as I map the track plan to the baseboard.

In the meantime, release the navvies!


Cheers,
Ben