Wednesday, 7 January 2015

Connecting Modules

This week I finished building the last of the module legs, which hold the return loop from the layout to the traverser. This is constructed from 42x19mm DAR pine with three adjustable feet, offset on each 'wing.'

Compared to everything else this far it's a pretty simple design. Yep - at this point I'm over carpentry. It's solid. It's portable. It works.

Job done.


Originally I was going to attach the return loop module to the traverser and layout using two loose-pin hinges per connection. The smallest sized hinge I could get with a loose-pin was 70mm, so I decided to use one per connection and mount it horizontally, which has worked well. An added bonus is that the hinges allow the module a little more vertical wiggle room if I need to adjust the height of the return loop module at the layout's next home in future. 


Between Christmas and now I had a bit of a run of my new Trainorama 48 taking it to a relative's DC layout. I can't add anything more than what others have said, other than it runs quite well and managed grades and loads as capably as the 47 and 49. It does have good, robust detail; nothing dropped off and waiting for you in the box when you open it up. I'm looking forward to converting it to DCC and adding sound in future. The A5 station in this photo is a hand-me-down, and I had arranged it with the G2 goods shed in this configuration for about a week to get an idea for how I eventually want it all to look. The G2 is definitely too big to achieve what I'm after, and I'm now certain the gable-roofed A3 will more adequately represent the country junction station I'm after.


Until next time, Cheers.


Monday, 29 December 2014

Traverser legs completed, plus some actual modelling

Today I got the traverser up onto its legs. Most of the designs you see in this blog I’ve replicated and reverse-engineered from pictures on various people’s blogs. The design for the legs is no different, and although I can’t actually remember which of the many rail forums I saw this idea in, I’ll explain it in a little detail.

Nearly all of the components are built from 42mm x 18mm dressed-all-round (DAR) pine. Exceptions are listed further down.

As the whole layout has to be portable, I needed the legs to be removable. The legs attach to the traverser module through guides which are covered with a 3mm MDF stay. Because I built the guides independently of the traverser design, the screws holding the stays also keep the guides attached to the module.


A 150mm-long piece of 30mm x 30mm DAR timber is attached to the bottom of each leg. At the base of this timber I drilled out a depth of around 25mm and slotted in an M10-thread T-nut. A plastic furniture foot screw with appropriate thread screws into this, giving each leg adjustable height.


I also built a shelf from the leftover timber and MDF, which rests on top of the lower DAR timbers and keeps the legs braced at the bottom. My track height is around 1400mm off the ground, so until I attach some diagonal bracing to the top of the layout it has a pretty solid wobble.

For the first few days after I finished work for the year it rained. This made the humidity in the garage too uncomfortable to start the traverser legs. Determined to do something train-related, I grabbed my Columbia Models 1971 BCW and the Tamiya weathering powders I've had sitting around for a while and had a go. I've detailed this wagon as per Ray Zhu's article in the February 2013 AMRM, and made a few other additions in underframe detail, new roof made from a venetian blind and added brackets for the uncoupling levers.


I used Pack B of the Tamiya weathering powders. I'm not overly impressed with them - the sponge applicator started to degrade before I'd completed the third side. I’m still not satisfied with the roof – it needs more of a red rust colour – but the sides came out well. I shared this photo with another modelling group on Facebook, where a number of modellers pointed out that I hadn’t painted the wheels. There’s another skill to learn! As much as I’d like I can’t say the BCW is finished yet, but it’s certainly coming along. Having read an article on weathering cement hoppers with powders in Model Railroader, I'm keen to try out the 'snow' colour in this pack on my PCC hoppers along with a HB pencil to replicate the weld lines, but that's another rainy day project.


I’ve undercoated the NRY, but that’s going to have to wait until after the next round of the season’s festivities tomorrow night.


Lastly, I hope you’ve enjoying reading these pages this year. I mainly pursue the hobby outside of a club or a regular group of modellers, so your comments and suggestions have been much appreciated.

Here’s to running trains in 2015!


Cheers,

Ben


Tuesday, 2 December 2014

Planning perils - Or, How I learned to stop worrying and detail a meat wagon

After I finished the traverser things haven’t gone much further. The end of the year cycle at work has required a bit of travel recently and is chewing my enthusiasm to do much when I get home. Designing and building the legs is becoming a bit of a chore. Whinge whinge whinge, I live in a first world country, and my only worry is building a model railway. Woe is me.

After all that I've settled on a pretty standard design for the legs of timber with adjustable feet. The legs will secure to the modules by sliding into a sleeve built from the leftover timber I have from the rest of the layout's construction. I’m currently waiting on the feet to come through in the post, so more on that once I have something to show.

To get my modelling fix I’ve been working on building and detailing one of the re-released Sydney Hobbies NRY kits. My partner bought me a Nikon D5300 camera recently for my birthday, so with a decent camera now at hand here's the NRY so far:


The lamp hooks are from the AM models brass casting, and most of the underframe detail come from the AR kits underframe detail sprue. The rest I've scratchbuilt from leftover evergreen styrene parts and brass wire. When I'm home later this month I'll undercoat it and post a few more photos. 

An N-scale NRY was my first kit about 15 years ago, I've always had a soft spot for them. The NRY's were introduced by the PTC in 1973 and lasted into the 1980s - so it fits nicely into my era. I added underframe detail from photos I took of the wagon that was until recently sitting in Bathurst yard. (It's now sitting in the Oberon yard in the care of the Oberon Tarana Heritage Railway). I'm indebted to Rob O'Regan's site for other photos of the vehicles from the late 1970s
As is usual when you take forever to complete a kit, it's now being made in ready-to-run. SDS models have announced they are producing the NRYs in ready-to-run. Christmas list. Added.


Now to wait for the postman...

Cheers,
Ben

Saturday, 18 October 2014

The Traverser

Finally I have something new to add.

This week I built the traverser. For anyone wanting to make a similar one, the frame is built from ply on the ends and top, and 65x12mm dressed-all-round pine. The frame is 1450mm x 450mm, with the left-hand entry being 250mm long and the right-hand one 200mm.

The table itself is 40x18mm DAR pine and ply on top, and measures 350mm x 990mm. I bought 300mm drawer runners from this company online and received them by courier within a week for about $27 all up.

Here it is with the table fitted, showing the construction

And when complete.


 The handles were from Bunnings and just add a nice finish.


I bought fully-extending drawer slides to maximise the traverse of the table and get as many roads as possible onto it. Part of this involved building the table one road-width wider than the drawer slides. As you can see in the picture above, the outer slide is affixed to the frame and the table is affixed 50mm from the end of the inner slide.

In the picture below, the table is fully extended out. When installed, the entry road will align parallel with the inner right-hand side of the table.


Once the drawer slides are fully closed, you can see that the entry road now aligns with the inner left-hand side of the table.


Pretty straight forward idea, derived from a lesson learned on my previous layout where the drawer slides I bought from Ikea only allowed for a 200mm traverse, despite being 300mm long.

Next job is to build the legs for this, and the right-hand return loop. Both should be fairly quick jobs, so it won't be long before there's some more permanent track down and I can move from carpentry to modelling.

Cheers,
Ben

Monday, 6 October 2014

Liverpool 2014

Progress photos were promised, and I'll come to that in a bit. For now, I just wanted to give a quick review of the 2014 AMRA Exhibition at Liverpool.

I went with the super-keen Saturday crowd, queuing up at 8.30 on Saturday, and making a beeline for Austrains when the door opened. With both them and Auscision promising sales it was a bit of a gamble, but after seeing a weathering demonstration by Aaron Denning at the Thronleigh exhibition I wanted to get another pack of WHX hoppers, which I did - $110 for four! Pretty happy with that, but weathering will come after I get an airbrush in a few months once the track is down. 

The surprise Auscision locomotive was revealed as being the 421, and the samples certainly look the goods. Although they fit my era, I've always seen them as out of my loose conformance to a western/north-western division theme. In the display case they shall stay. 


In addition to the WHX's my haul from the show was light at a pack of SDS's SRC containers, and a German-language magazine I annually hang out for from the Orient Express stand to refresh my language skills. The rest of the haul went to the family to be gifted at a later date during Christmas or birthdays, which will see the workbench will graced with a Silvermaz TRC kit to detail with an IDR underframe, and an IDR Castings OSF, 

It was good to see a running sample of the Trainorama 48 on Geoff Small's 'Ashburn' too. As you would imagine with anything you paid for eight years ago, I spent a lot of time studying it as it towed a short mail train consist around. If you couldn't get to the show to see it, it looks like it won't disappoint. I've ordered an Auscision one recently too (with 165 in the class, you can never have too many!). Apparently the Auscision 46 was getting around on Ashburn later on the Saturday too.

Turning briefly to 1:1 scale, I left the exhibition after lunch for a wedding near Wollongong. I got changed at the Engadine Macca's, which is right next to the railway line. Going back to the car something loud and determined shot past in the cutting next door, heading south. As I was heading down that way anyway, I jumped in the car and headed to Stanwell Park station to see these 82's roll through. It was a nice end to the trains for the day.


Back to the layout.

A few other bloggers have extolled the virtues of the Connect-It range of aluminium lengths and plastic connectors from Bunnings, so I picked up some over a few nights last week and built the legs to support the modules on Friday afternoon. 


Aside from the light weight and strength, probably the biggest benefit is the speed with which you can knock together almost anything with these. I built the legs in less than an hour, probably closer to 40 minutes.


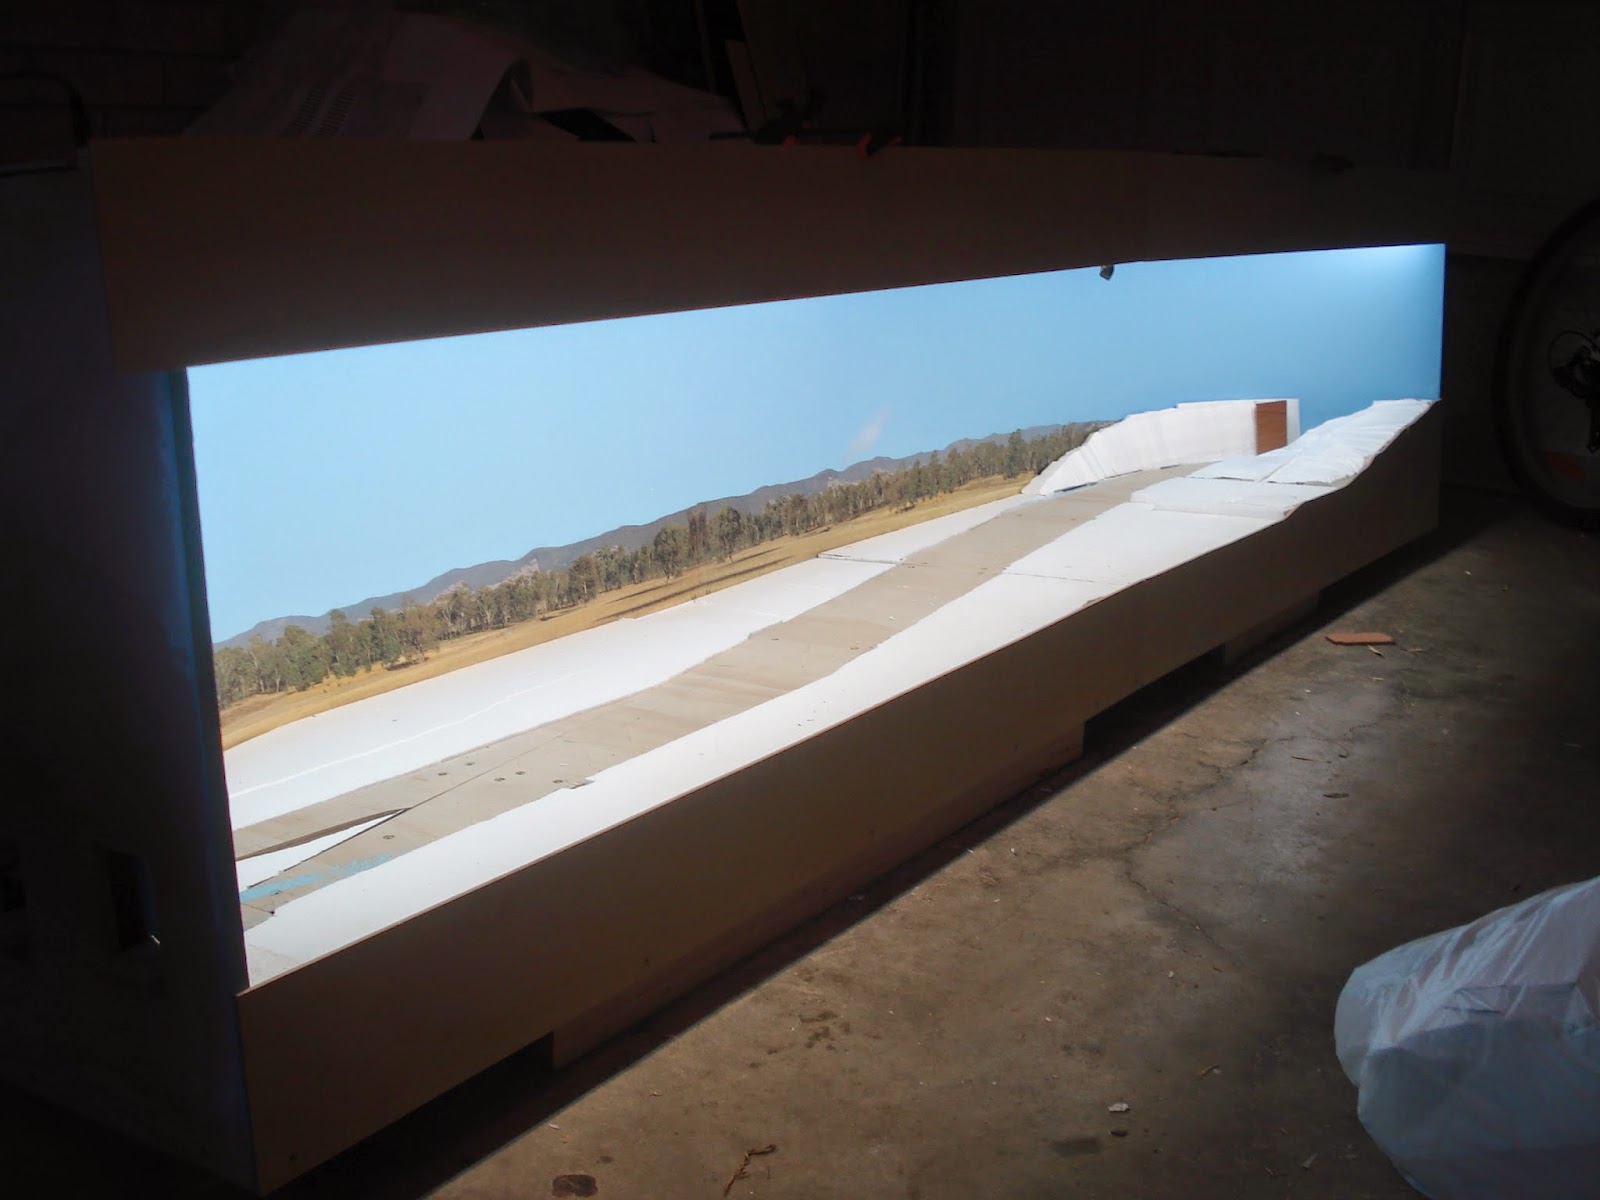
After that, my attention turned to carefully cutting the backdrop with a hobby knife and separating the module. For what is going to be a portable layout, the two modules had been bolted together since February. Separately them for the first time is kind of a big thing. Next, they were both moved upstairs with the help of my ever-patient partner.


Voila!


It feels encouraging to get to this point, so I got some track and rollingstock out to have another look with a little more done. The track boards appear to not be level on the left-module, despite being level when they were installed in the garage, so I'll need to have a play around with that before track can be laid.


I started building the traverser module this afternoon before my interest in spending more time in the garage waned. It's something I will get to, however next up is fitting the pelmet and painting it. I wanted to keep that part off until everything was upstairs to allow for any adjusting if required, but so far it's looking ok to do later this week.

Until then, happy modelling!

Cheers,
Ben


Monday, 29 September 2014

Passing the Liverpool distance signal

I've been to every one of the AMRA exhibitions at Liverpool since the early nineties, including the side show to Hurstville, so it's been a landmark in my calendar for as long as I can remember. Going to the show inspires me to consider different scenery, operating procedures or train composition and detailing in my own modelling, and overall I usually walk away with a few new ideas and a kit or two. Falling on the October long weekend, it also heralds the start of a season of the year more conducive to modelling; more time through annual leave and daylight savings, warmer weather, all punctuated by the requests for stocking-fillers by the family for Christmas. Another InFront Models sleeper wagon? Hmmm. I do need one of those. Thanks Santa!

With the exhibition now truly in sight for this year, I am predicting the urge to want to get track down pretty much as soon as I get home. I have an imperative to finishing painting and moving the layout upstairs.

This weekend just past saw the fascia, ends and underside of the lids undercoated in preparation for sky blue to be applied to the lids to be less distracting in photos, with black on the fascia to complete the shadow-box effect.


The return loop was also painted black and dried quite quickly on Sunday. It's now sitting upstairs in the train room. One down!


Tomorrow will see the lids and hopefully the fascias painted. You by now get the idea of where it's up to and where it's heading so I'll keep it mostly to photos until we get to something new. 

Like tracklaying.

Cheers,
Ben


Wednesday, 3 September 2014

One step forward...

Last week it rained in Sydney. Brilliant, I thought; indoor weather and plenty of time to do some more to the layout.

Until I arrived in the garage. 

With limited insulation and ventilation in there, the moisture from a few days' worth of rain had built up and warped all of the MDF components of the modules - namely those which I had only just completed!


So, after a quick trip to Mister Ply & Wood for some 4mm B grade external plywood, I'm now back to where I was three weeks ago. Lesson learned.


On the plus side, I had do a little landscaping to get the fascia fitted, so a little more has been completed and I've been prompted to think about the final scenery shape. The block of wood in the below photo is sitting where a retaining wall coming off the overbridge supports will go.   


Happy modelling!

Cheers
Ben